Showing posts with label 3d. Show all posts

Sunday, 6 July 2014

Some random head sculpts

#1

#2

#3

#4

#5

Hers a selection of some character heads I made the other day. I created a nice base mesh head which made it easy to form a variety of different faces relatively quickly. They aren't very detailed but the essence of each character is noticeable - which is what I was after! 
Its amazing how some subtle enough changes (eye size, eye distance. angle of mouth) to a simple base mesh can alter a persons appearance so drastically.

Click on the images for larger shots. (#1, #3 and #5 are my favourites of the bunch)
(The top one is the only one I bothered posing/adding asymmetry to so far, so thats why the others might look a little 'odd' and 'blank'  initially)

Friday, 4 July 2014

Shapula Free Base Mesh for Sculpting

I made this nice little mesh which is a great for starting off sculpting a character with. I never personally use any of the base meshes that come with Zbrush and instead prefer just modelling from scratch with a dynamesh ball...but this model I created is one I ALWAYS use lately for starting off a sculpt. 


-The download file is in a .zip format (which you can unzip using any of the popular or free software such as WinZip, 7Zip, etc). 


-Once you've unzipped the contents you will have an .obj file of the model which you can load in any 3d software package.


The model is totally free and can be used for any commercial or noncommercial use.

If you make anything nice with it feel free to link back and let me know if you want :)


You can download the .zip file from here 

Wednesday, 18 June 2014

Lord Xamachial - Zbrush W.I.P #03

click to enlarge
I eventually got around to painting his skin and giving him a tattoo.

Tuesday, 3 June 2014

Zbrush clay render Turnarounds of previous sculpts

Today I'm posting some clay render shots of some of my previous sculpts in Zbrush.
The main reason behind doing this is to gauge my sculpting progress over time. When I first  picked up Zbrush a couple of years back (around this time of year in 2012) I had never sculpted a thing in my life! 
Actually thats not true: when I was 14 or 15-years old I made an alien for a school project in some sort of clay. Needless to say it was crap! It had 3 'legs', no arms or eyes, and a long snout with 'teeth' at the end. 

But anyways, ignoring that particular sculptural disaster, sculpture just wasn't my thing. So when I tried Zbrush it was a whole new territory for me. And I loved it. Now I wasn't very good at it mind, but it was a lot of fun using the program. 

I'm happy to say that I've got better at it and more confident in what I can make with it.
A big help was the endless supply of quality work that inspires me - people such as these talents, amongst many others:
http://pilcrowdesigns.deviantart.com/
http://trevorgrove.deviantart.com/
http://alfredparedes.deviantart.com/
http://marknewman.deviantart.com/
http://boularis.deviantart.com/
http://thiagoprovin.deviantart.com/
http://locasciodesigns.deviantart.com/
http://monsterpappa.deviantart.com/


I've written a little about each of the images below explaining what I've learned from each.
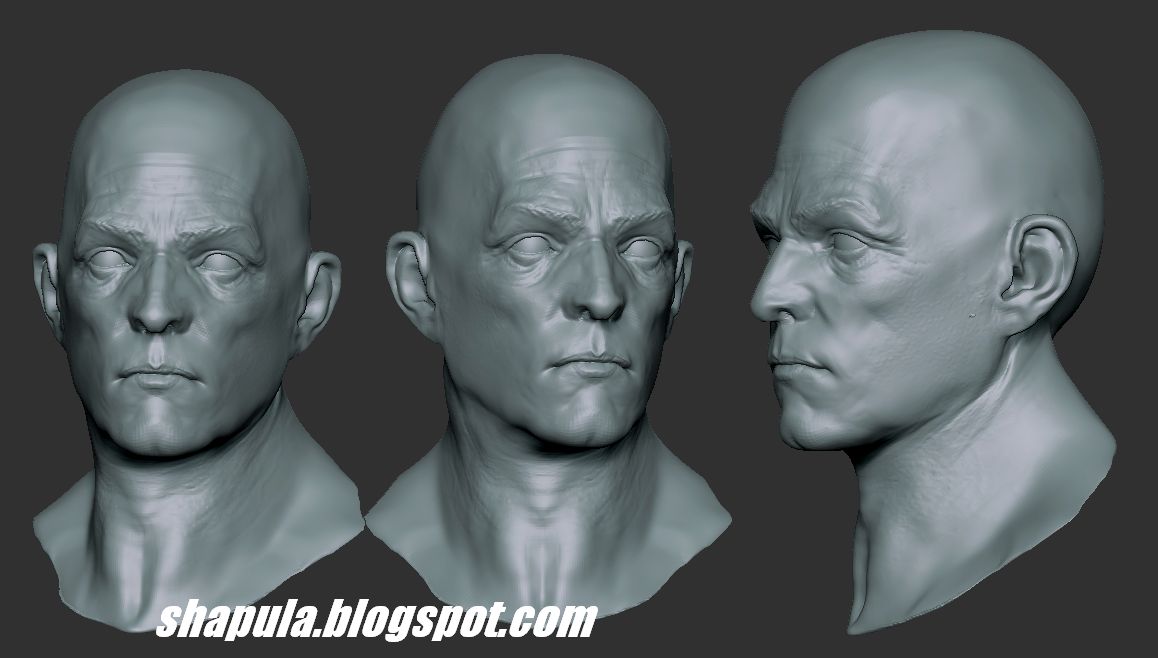
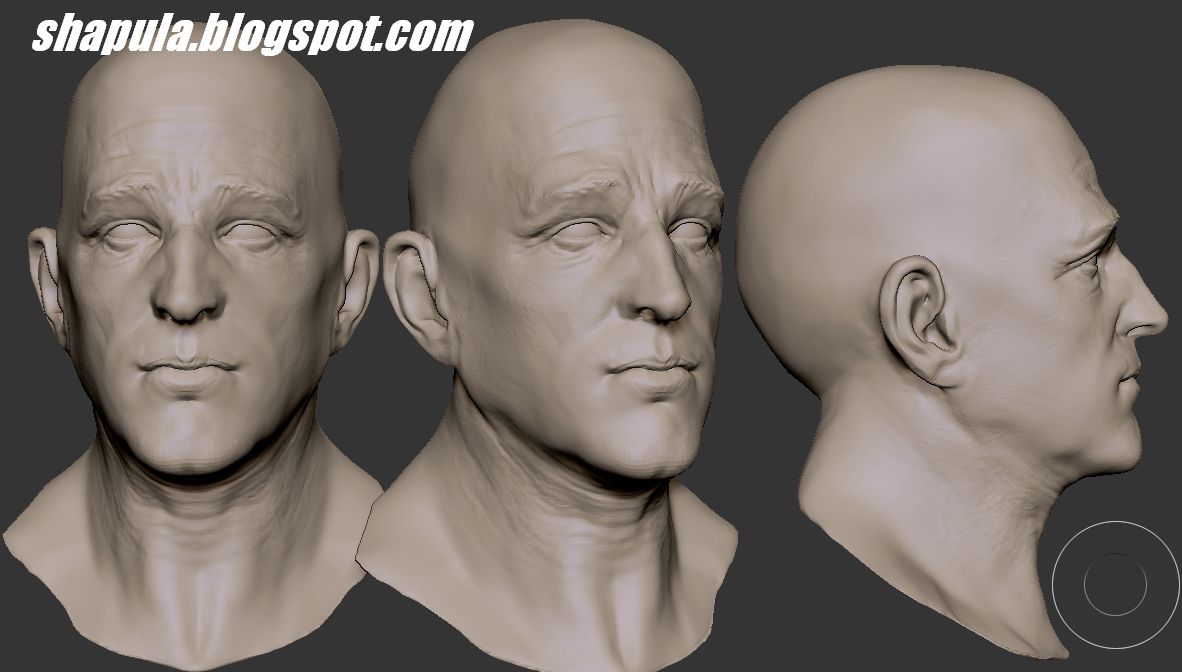
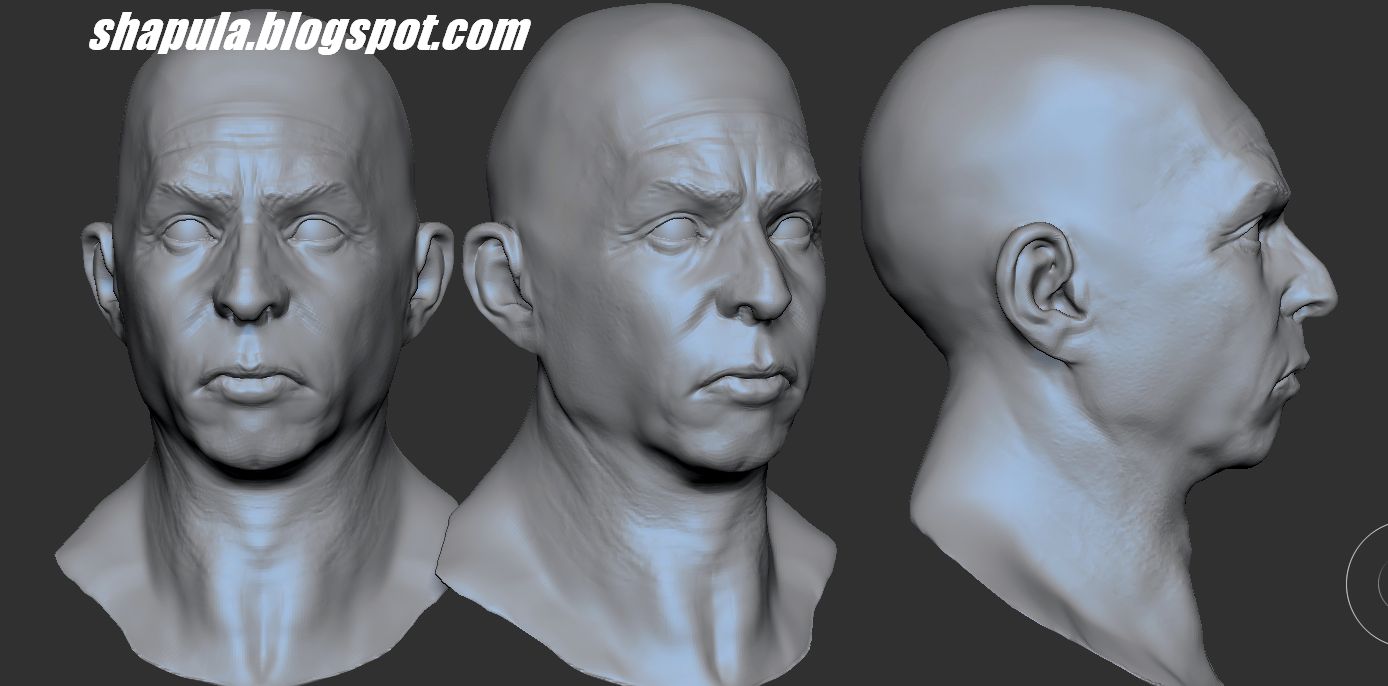
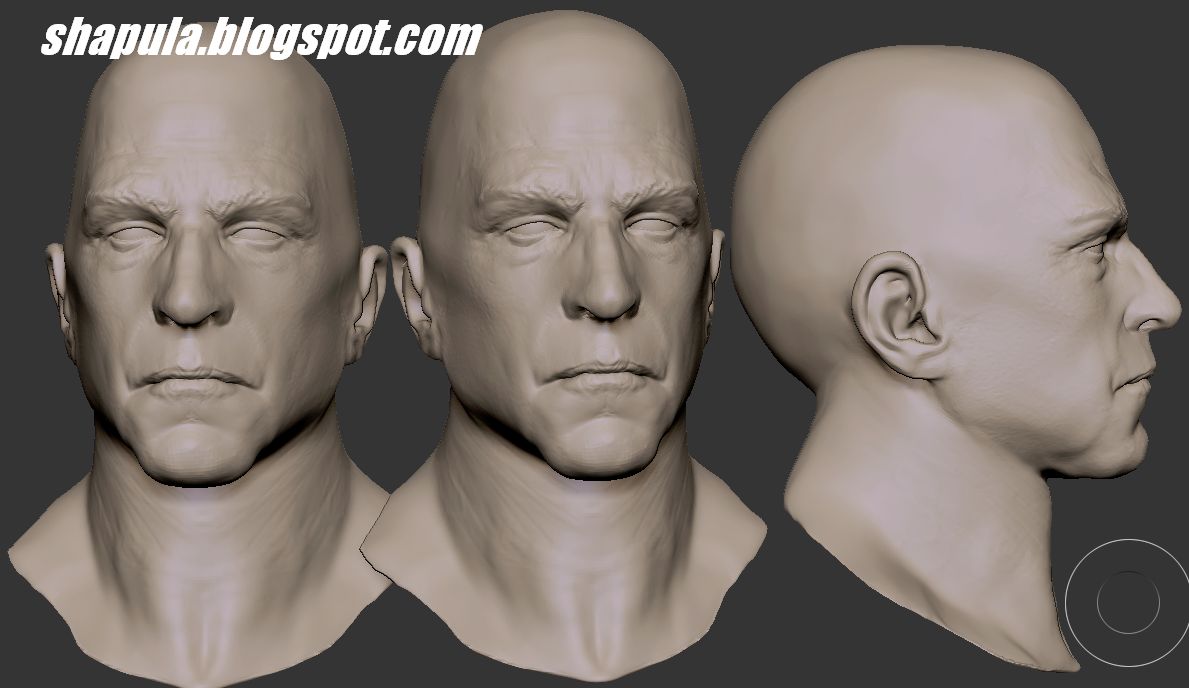
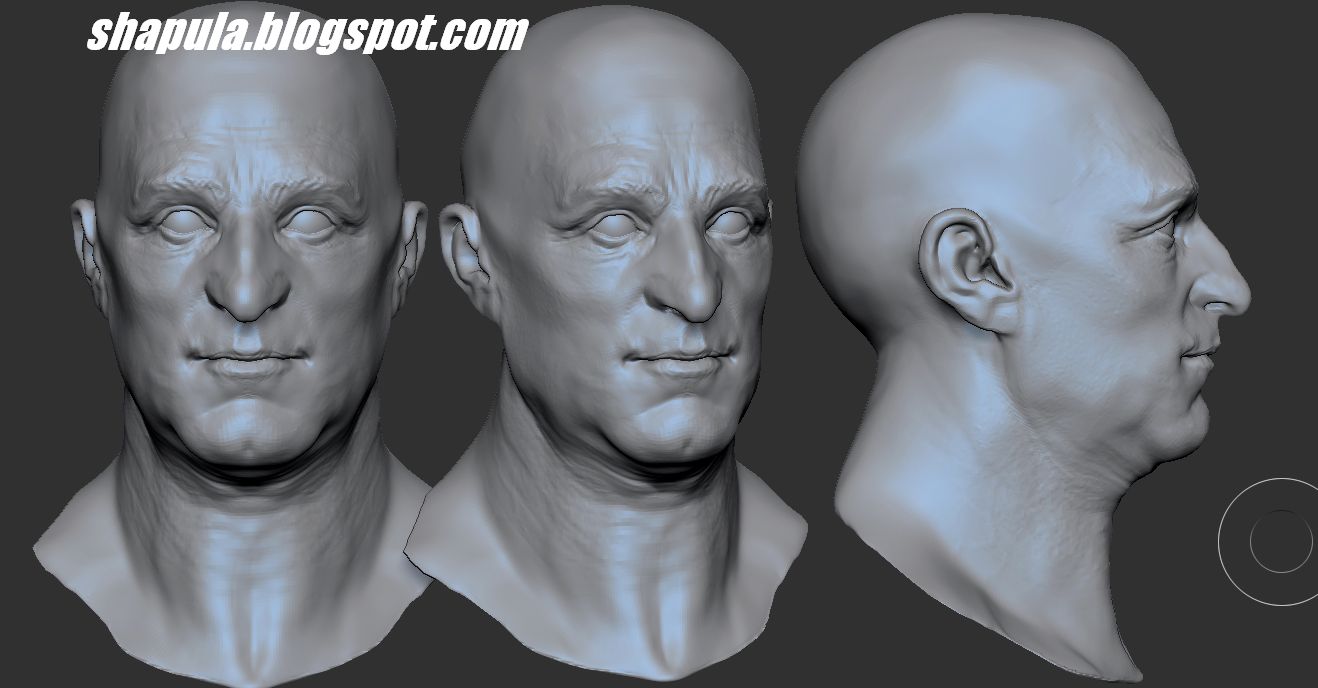
1: click to enlarge
 1: The character heads above have something my earlier sculpts didn't - 3-dimensionality! Seriously, my earlier sculpts where designed to be seen purely from one angle alone (meant for 2d paint ups only). In the two shots above I'm pleased to say that they could be viewed 'in the round' and not look like s**t.
I paid special attention to the eye area - something I always try to get right. if you lose the eyes, you've lost the character.
If I was making these again I would work more on facial creasing by using the Dam Standard brush which is perfect for that kind of stuff.
2: click to enlarge
 2: The full body images above show 'Alien Shorty' and 'Blue Nose the Clown'. Both were made around the same tie as can be seen from the similar bodies of both. I created their base mesh for another uncompleted character which I just tweaked to suit these guys. The muscle definition and overall anatomy is pretty decent on these two. It's believable. Notably this was the first time I ever made toes! Toes are complicated little fellas. But  details  are important even if they're not gonna be seen.
3: click to enlarge
3: The two images above show 'Diet of Worms' and 'The Old Man of the Sea' which both feature a 'tentacle' theme. The fat woman's anatomy is pretty good by my standards and, again, believable for the character. I paid attention to her fingers and hands which is something I would previously have just glossed over and hidden from view, probably. I tend not to make female characters, but a big fat female with layers and layers of fat is the type of thing I can work with!
The Old octopus-shaped guy has a nice, relaxed pose. His body was fairly easy to make as I knew at the time it would be mostly covered in tattos so detailing was kept to the minimum.If I was making him again I'd work more on the detailing of the tentacles and the definition of skin creases and folds to emphasize his elderly, sagging skin.

Thursday, 29 May 2014

Mister Pointy - Zbrush W.I.P #1

click to enlarge
Here's a Zbrush screen grab of a little fella I just started called ' Mister Pointy'.

I took an old Zbrush sculpt I did ages ago and reworked it with some improved anatomy and a completely  different head.

I've also got really excited about using the Dam standard brush, which I never ever use. It really is brilliant for working in sculptural details such as wrinkles and folds.

The thing I love most about Zbrush is how you can be using it for ages and yet still discover new tricks and techniques you never considered before.

Wednesday, 7 May 2014

Blender and Zbrush working together

click to enlarge

click to enlarge
Here's two screenshots from Blender of two characters  I'm working on - Lord Xamachial and The Dark Prince (both still rough W.I.P's as you can probably tell)

I tend to always sculpt and render from Zbush (and then fiddle around in Gimp afterwards for good measure), but for these two I'm gonna try and do a little Blender 3D rendering.

So far the results look good (well, to me it does!)

More updates when I...ahem, update :)

Monday, 5 May 2014

Lord Xamachial - Zbrush W.I.P #01

click to enlarge
This is a Zbrush character I took a break from and came back to.
A lot of things to still work on but the basics are all there.

Click the image to view the screenshot in a larger size.

Thursday, 13 March 2014

Reptilian Man - Zbrush sculpt

click to enlarge
Here is my completed REPTILIAN MAN character.
I'm actually surprised how quickly and easily he came together...and still managed to come out looking pretty good.

He was modeled and polypainted in Zbrush. Including the fibremesh hair, in total he was approximately 2.8million polygons in size (I generally keep all my models below 3 million, most are only about 1.2 - 2 million)
I rendered out several BPR (Best Preview Renders) renders in Zbrush, but I depended mostly on direct screenshots (as I knew I was gonna be blurring/smudging everything anyways in Gimp)

Zbrush screenshot turnaround image
(Click to enlarge)
The good stuff started happening in Gimp where I composited the layers and repainted bits and bobs. Its actually kinda depressing when you first start piecing the images together as they tend to look ...crap! A whole lot of experimentation with different masks and multiply/screen/burn/hue layers slowly masks the picture start looking a bit more decent. 

I settled on a nice 'look' that suggests this guy has been photographed in a studio setting. Maybe it's his actors headshot so he can land big roles in some Hollywood movies? Maybe not....

Anyways, hope you enjoy he image as much as I enjoyed making it.


Friday, 15 November 2013

A few Zbrush Turnarounds of recent Character Sculpts

The title says it all!
"STFU"
At one stage I considered rendering him from behind  because  I liked the pose so much...sensibly I decided to go with a frontal view instead.
click to enlarge

"Frankie Say Relax"
The feet were basically ignored  because  I was  definitely  not going to show them in the  finished  piece.
click to enlarge

"The Old Man of the Sea"
The mound of skulls was made from a single skull that was duplicated in Blender. I re-entered Zbrush and used the Dynamesh Master plugin to reduce their total geometry to aprox 100k polygons.
click to enlarge
I decided to post these turnaround shots because I think its nice to be able to see the characters in the round.
When I'm working on them I generally have an idea of what angle will be shown from in the  finished coloured illustration, but I like to work on every part of them so as to give me some options...plus also it's actually a whole lotta fun doing it!

These are direct Zbrush screenshots (not rendered) and the shader used is the basic blinn matcap using standard lighting.

Friday, 23 August 2013

Zbrush work in progress - possible Zombie Hunter?

Again working on improving my anatomy work in Zbrush, I've stared this guy. 
I made a base mesh a few weeks back that I'm fairly happy with to start from, so I can dive straight into working on the facial features of the figure. 
As you can see this guy is a fairly standard 'hero' type. 

But if you know me and the stuff I do you'll kinda know that I don't usually do hero's.....freaks and weirdo's are my stock and trade!
So, although he seems a typical genre archetype at the moment, I'm sure I'll mess around enough to make him a certifiable oddball :D
Could you beat him at a staring contest?
click to enlarge
I love this stage of working on a character. The part where you can just toss around ideas and invent a personality or  back-story to the model.  Because of just finishing my previous zombie guy I'm thinking this fella could be a zombie hunter or something like that. Whether he's a part of an elite military unit or just a lone wolf has yet to be decided. Who knows, he could turn into a clown midget for all I know!

If you've got any suggestions/ideas then don't be afraid to share your thoughts.

Thursday, 22 August 2013

No Guts No Glory - Zbrush Zombie image

This zombie I made has been sitting around for a few days like a decaying, rotted corpse - so it's about time I upload him for all to see!
In a previous posting I mentioned I wanted the zombie to wear a t-shirt with something written on it. 'No guts no glory' just seemed the perfect fit!
Paint job was mainly done in Zbrush using various BPR renders which I then exported to Gimp. Hair, blood splatter, eyes and smoke was hand painted in Gimp using basic brushes and some custom ones I made.
After I was satisfied with the pic I opened it in IrfanView for final touches such as chromatic abberation, zoom blur, sharpening and noise.
Getting a rabid zombie to sit still for a posed shot like this is not easy!
click to enlarge

A basic clay render screenshot from Zbrush of this charming fella.
click to enlarge

Tuesday, 20 August 2013

Zbrush Practice - Head Studies

Some head sculpts I did to try and get better at general  anatomy when working in 3D space. Minimal detailing so that I could try and focus purely on form and shape.
 
I made a simple base mesh (you can see it in a previous posting) and then adjusted the head to suit a variety of facial types.

The eyes look a bit crappy (a ball with an indent in it, basically) and are  mainly  just there so  that  I could get the curvature of the eye correct.
These are base sculpts with no asymmetry...hence the extra freaky startled look on these guys faces!
click to enlarge

Thursday, 15 August 2013

Tutorial - Adding torn holes to clothes in Zbrush

My zombie needs clothes badly.
He's wandering around chewing peoples faces off...and all the while naked! he's liable to get arrested for indecent exposure (and cannibalism).

The trouble with zombies (isn't there always such a problem with those crazy guys?)is that they usually don't go around in their Sunday best. Zombies are messy and their clothes get ripped and shredded all the time. 

Recreating this in Zbrush is a slight problem  sometimes because Zbrush doesn't like open meshes - and torn clothing = open mesh.
So it's better to model stuff in it's pristine perfection first and then mess it up with holes and whatnot at the end. 

This is probably one of the simplest tutorials you will ever see for Zbrush.
click to enlarge
The final image in the tut is not the greatest you'll ever see(I spent literally a grand total of 2 minutes on it) but with a tiny bit of extra effort you can get some great looking ripped clothes effects.

For a more complex way to achieve realistic torn cloth/fabric effect in Zbrush you should check out this thread on ZbrushCentral by artist GMP1993. Also read this thread by LVXIFER which develops the idea further. I don't know much about using Micromesh in Zbrush and haven't tried the above tips yet but the results are amazing. (I think this trick only works for internal Zbrush renders using BPR so probably not suited if you want actual geometry that you can take into a different software program.) 

Wednesday, 14 August 2013

More Zbrush zombie stuff

You can never have too much zbrush zombie action!
Some screen grabs from Zbrush which I then combine and annotate so that I can figure out exactly what I need to correct/destroy!
click to enlarge
The Matcap used in the above image is available from this download link on my Deviantart page.

Monday, 12 August 2013

Zbrush Zombie - new face WIP

I took a break away from my zombie model because I was unhappy with the way he looked (check out my previous blog posts and gaze at horror at the ineptness of my work). 
He had the kind of face only a zombie mother could love..........I wanted to give him the kind of face any mother would love a zombie to have!

So I started a new zbrush project file and began sculpting a 'better' zombie face while looking at lots of excellent zombie  references - particularly the sculptures of pilcrowdesigns (a brilliantly talented artist who you need to check out) 
A screenshot from Zbrush of the newer zombie head with zero detailing.
click to enlarge
Even at this early stage he looks better.
click to enlarge
Sometimes tinkering with a dodgy piece of art can manage to turn it around to looking half decent. But in general it's better to save the tedious time and effort and just start again from scratch with something you actually like.

Wednesday, 7 August 2013

Anatomy Practice

Been practicing anatomy with Zbrush. 
Took my zombie model - which had some dreadful anatomical problems - and went to work on it while looking at anatomical reference images. 
It's clear to see that I still put absolutely no effort into those feet!
Reference is the way to go and I'm hoping to put more effort than I have been into my work as I go along.
See how he skillfully balances an opaque football in mid-air!
Click to enlarge

Friday, 2 August 2013

Zbrush Zombie WIP - Another Update!

I decided to chop the right arm off the zombie to make him a bit more zombi-ish. 
below is a pic of the model painted up. I haven't fully decided whether I'll go colour or B&W but it's nice to have the option of both.

Zbrush screengrab of polypainted model.
Click to enlarge
 Having a bit of a problem UV unwrapping the torn shirt in Zbrush: must be something to do with it being a very thin mesh or something.

Closer shot of facial detail.
Click to enlarge
I'm still not exactly happy with his face......it looks good in the image above from an upshot angle though so might stick with it. Who knows? 

Thursday, 1 August 2013

Zbrush Zombie WIP update

Here's another update on my zbrush zombie
I couldn't work on him for a couple of days 'cos I got stung by a wasp on the finger I hold my wacom pen with :(

I'm happy with the pose I got using transpose master in Zbrush. I like the idea of this nose-less zombie leaning around as if he's just sniffed some fresh human blood in the air!

Back view of the torn clothing in Zbrush.
click to enlarge

Another Zbrush screengrab.
click to enlarge

This will be the first time I've used Blender (or any outside renderer) to render a Zbrush model. I intend to use some Zbrush matcaps in Blender - which can look pretty good. I'll also get the benefit of Blenders fast renderer (the basic one, not Cycles which I've never really taken to)and use the GLSL shader in the viewport to get the exact lighting setup I want.
The base mesh in Blender for lighting test set-up.
click to enlarge
I actually have the character poly-painted/textured but I kinda prefer the untextured look at the moment. I want to work on form and silhouette as well as some good high-contrast lighting, and a lot of the time a painted model can hide some serious design flaws....which I hope to avoid!

Monday, 29 July 2013

Zombie - Work in Progress

A couple of work-in-progress screenshot images of a zombie dude I'm making in Zbrush. Just trying to get the overall shape of the character right at the moment and not waste time on detailing or the 'fun' stuff until I'm satisfied he doesn't look like a complete load of crap!
The character is around 500k polys, his teeth are two separate meshes of approx 30k polys.
fig 1: trying to get correct 'zombie' proportions and a good face.
click to enlarge

fig 2: simple pose test to check what looks stupid/cool.
click to enlarge

Sunday, 28 July 2013

Zbrush ZRemesher Simple Test

Zbrush 4R6 has introduced an enhanced version of it's automatic retopology system called ZRemesher.

I decided to do a very quick test with it using my Monster Cop model.

click image to enlarge

click image to enlarge


click to enlarge image


It should be noted that each retopo took around 40 seconds or less to do and if you don't like how it turned out you can just hit CNTRL+Z and restart.

You can easily turn a dense mesh into something more manageable for export to another application, or for  animation  with one simple click. Is it perfect? of course it's not all the time, but  it helps hugely in allowing you to focus on modeling instead of the more boring aspects usually associated with 3d work.

It's simple and  functional  and takes the tedium out of manual retopology - what's not to like!